Digital Photography & Imaging - Exercises (Mr Martin)

24/8/2020 - ?/?/2020 ( Week 1 - Week ? )
Phoebie Ng Cia En (0341172)
Digital Photography and Imaging
Project 1 ( Exercises )
LECTURES
week 1
we saw some of the previous senior work today, we also went through Module information booklet which we know the basic structure of the whole module.
We also learned that Photoshop is a graphic design and photo editing software. Photoshop can be use to edit and compose images in multiple layers.
We played a game called Bezier during class which it could help us practice on how to use pen tool in Photoshop or Illustrator.
week 2
Mr Martin taught us in detail for Shazam exercise. We have to put Shazam into the Hearst Mansion photo.
1.Cutting image: use selection tool to select the area that you want to cut, copy and paste the selected image into the Hearst Mansion image.
2.Matching color: Image>adjustment>match color
3.Creating shadow: Brush tool to draw the position of figure, lower opacity of the layer, and create blur effect by going filter>blur>gaussian blur
4.Creating reflection: duplicate Shazam layer, rotate the photo -100%, use pen tool to and crop the unwanted area.
week 3
we were introduced to double exposure, blending tool, gradient to create effects. for this week exercise, we need to combine sky, house and ghost image together.
1.Select image: quick selection/ Lasso tool
2.Match color: image >adjustment> match color
3.Gradient: gradient> radial gradient> black and white
4.Bleeding tool that we will use often: multiply hides the light parts, screen hides the dark parts, overlay in between.
week 4
we were taught how to use different blending tool in class.
1.Blending mode:(screen): apply screen blending mode to the smoke to make the background transparent. (multiply): use the Lasso tool to select the birds, apply multiply blending mode, adjustment> level to adjust the white background.
2.Gradient: gradient> radial gradient> black and white > lower capacity
week 5
we were taught how to recolor black and white images.
1. We need to use brush tool to recolor each section for each layer. After coloring we need to apply blending mode of soft light. We need to apply the blending mode for every layers.
2.Select color from image: we need to select color from image that Mr. Martin provide for skin and hair color. We need to use dropper tool to select 4 colors from each image for light to dark tone.
3.Select area: Use quick selection tool to select the area that I want to color.
4.Add color: add solid color, select colors from the sample, add blending mode.
5.refine mask: refine the mask by clicking select and mask and use brush to refine the area that we want.
repeat the steps for each layer.
week 6
we were taught how to make displacement in image.
1.Adjust image to black and white: Image> adjustment> black and white
2.Blur the image: blur>gaussian blur save image as psd
3.Move flag image to fabric image that had turn to black and white
4.Displacement: filter> distort> displacement
5.Edit scale: horizontal: 10 verticle: 10
6.Apply multiply blending mode.
7.Duplicate the flag layer and apply multiply blending mode to bring back the white of the image
week 9
we were taught to make human into cyborg part 1
1.Use pen tool to draw shape one Bora's leg
2.apply mask on the area that we selected
3.use clone stamp to cover the area that we selected with background
create eclipse tool to make a circle for her leg.
4.Place the cyborg picture on the empty place
5.Use pen tool to draw line and create stroke path to create cyborg line.
6.Apply mask into new duplicated image
7.Apply Bevel and Emboss and adjust the setting
week 10
we were taught to make human into cyborg part 2
1. Mask out her skin and apply blur, level for adjustment, merge with geisha layer
2. Use pen tool to mask out the right face, draw a square
3. Open blending mode, adjust Bevel & Emboss, drop the shadow
4.crop the plug and move to main layer
5. use pen tool to draw on the skin and fill stroke and adjust bevel & Emboss
6. open computer board , use stamp tool copy and paste
7. apply gradient tool, select screen mode
INSTRUCTIONS
TASKS
week 1
1. Present 3 excellent Photoshop work on blog.
2. Play GAME: https://bezier.method.ac/

fig 1.1 photoshop work by Manu Pombrolis 25/8/2020
I like this Photoshop work as it is super realistic and interesting. The way the artist arrange the feature of face and edit it onto hands is interesting. This photo also provide a great contrast which is powerful.

fig 1.2 Photoshop work by Christian Hopkins 25/8/2020
This photo is delivering message to the audience which is what I like about this Photoshop work. Emotion was presented in this photo, it shows how struggling the person was. It might looks a little bit uncomfortable but it visualize how depression feels like.
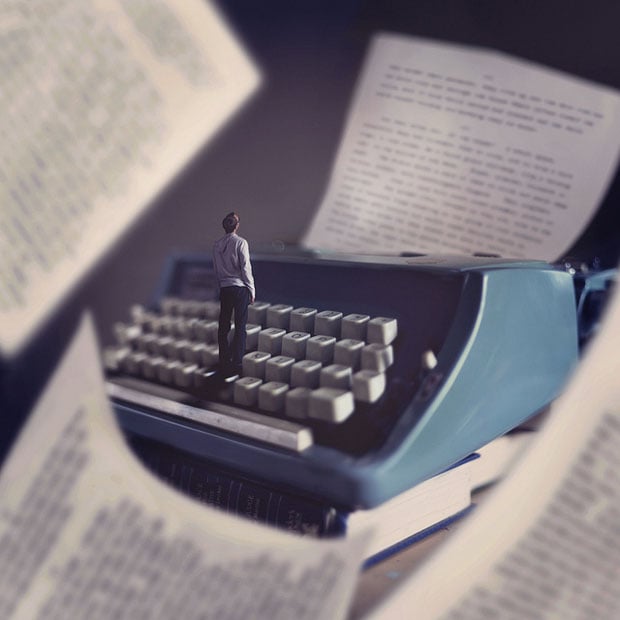
fig 1.3 Photoshop work by Joel Robison 25/8/2020
I like how Joel Robison create surreal photo with a tiny person in a larger world with Photoshop. It is creative how the person standing on the typewriter, it gives us a illusion that the typewriter is huge.
THE BEZIER GAME:
 |
| fig 1.4 bezier game screenshot 25/8/2020 |
week 2
Exercise 1 Heart Mansion work part 1
We have to edit the picture of Shazaam into the Heart Mansion using Photoshop by given tutorial.
These are the 2 photos that provided for us:
 |
| fig 1.5 Heart mansion photo 8/9/2020 |
 |
| fig 1.6 Shazam photo 8/9/2020 |
Final outcome:
 |
| fig 1.7 final outcome of Heart Mansion exercise 8/9/2020 |
I had learned a lot of thing during the exercises, including how to match the edited photo color with the background, how to use selection tools, how to do reflection and shadow.
week 3
Exercise 1 Heart Mansion work part 2we were told to take our own photo and edit into the Hearst Mansion photo. I asked my brother to took the picture of me which it is on eye level.
 |
| fig 1.8 final outcome of Heart Mansion exercise part 2 8/9/2020 |
I avoided taking picture from complicated background and I wear blue color clothes and took the picture against a white wall. I followed everything that I did for exercise 1 part 1. However, I think it is still a little bit not real as my body lighting is different form other subjects in the Hearst Mansion photo.
week 4
Exercise 2 Ghost house part 1
 |
| fig 1.9 ghost house final outcome 15/8/2020 |
I think it is not that hard. What I had learn from the exercise compare to last exercise is how to use mask and brush tool to refine the mask. I also learned about how to use brush and reduce the capacity to have the glowing effect for the ghost.
Exercise 2 In class exercise part 2
I had followed the lecture that Mr. Martin gave in order to produced the following 3 exercises. I had learned how to use blend mode to crop things how to create gradient for the picture to have dreamy effect.
 |
| fig 1.10 before 15/8/2020 |
 |
| fig 1.11 after 15/8/2020 |
 |
| fig 1.12 before 15/8/2020 |
 |
| fig 1.13 after 15/8/2020 |
 |
| fig 1.14 before 15/8/2020 |
 |
| fig 1.15 after 15/8/2020 |
For this exercise I had create contrast using level and curve and also gradient to give the focus to the person.
we were told to complete this exercise using the technique that we had learned during class.
 |
| fig 1.16 cowboy exercise final outcome 18/9/2020 |
For this exercise, I had used the quick selection tool to crop the cow boy and pen tool for the house. I did adjust the background photo to fit the photo better. I had adjust the brightness of cowboy and house darker as they are facing behind the sun, so it will looks darker.
week 5
Exercise 3 recoloring part 1
we were told to recoloring the photo by watching the recorded video.
 |
| fig 1.17 before 22/9/2020 |
 |
| fig 1.18 after 22/9/2020 |
For this exercise, had used brushes and blending overlay mode to recolor this photo. I think this photo still looks a little bit weird as the hair color and skin color doesn't match really well.
Exercise 3 recoloring part 2
 |
| fig 1.19 before 22/9/2020 |
 |
| fig 1.20 after 22/9/2020 |
For this exercise, instead of using brushes, we used quick selection tool to select the parts that we want to recolor and blending overlay mode. And I had learned a very cool thing that we could refine the mask. For this image, I think that some of the hair are not colored yet, because it is too thin to crop.
Exercise 3 recoloring part 3
 |
| fig 1.21 before 25/9/2020 |
 |
| fig 1.22 after 25/9/2020 |
For this exercise, it was a little bit challenging because of the smoke, I also did adjust the contrast of the photo after I had colored it. I think some parts of the body is too hard to see, so I am not sure if the parts are correct or not. I think for this photo, it is hard to maintain the smoke as I want to change the color of the background.
week 6
Exercise 4 displacement map part 1
we were taught how to use displacement map by watching the recorded lecture videos and exercise in class. These are the exercise that we did by watching the video.
 |
| fig 1.23 displacement map exercise on flag 28/9/2020 |
we were asked to combine our Malaysia flag and the flag together. the steps are written down in the lecture section above.
 |
| fig 1.24 displacement map exercise 28/9/2020 |
 |
| fig 1.25 displacement map exercise 28/9/2020 |
Next, we need to combine the flags on the human face.
Exercise 4 displacement map part 2
These are the exercise that we did in class.
 |
| fig 1.26 displacement map exercise 28/9/2020 |
 |
| fig 1.27 displacement map exercise 28/9/2020 |
 |
| fig 1.28 displacement map exercise 28/9/2020 |
 |
| fig 1.29 displacement map exercise 28/9/2020 |
Exercise 4 displacement map part 3
These is the exercise that I did at home. I had did plenty of them to find the best match.
 |
| fig 1.30 displacement map exercise 28/9/2020 |
First, I had combine the skin of snake and the body of rabbit together. I found this quite interesting but it seems a little bit weird.
 |
| fig 1.31 displacement map exercise 28/9/2020 |
 |
| fig 1.32 displacement map exercise 28/9/2020 |
Third, I had use the leopard skin and apply it into the fish image.
 |
| fig 1.33 displacement map exercise 28/9/2020 |
After that, I tried different image of leopard skin and apply it into the elephant image.
 |
| fig 1.34 displacement map exercise 28/9/2020 |
Lastly, I tried in on chameleon and I think it is the best combination among all the combination that I had tried.
Exercise 5 cyborg demo part 1
We did exercise of turning human to cyborg exercise in class.
 |
| fig 1.35 cyborg demo part 1 before 02/11/2020 |
 |
fig 1.36 cyborg demo part 1 after 02/11/2020 |
Exercise 5 cyborg demo part 2
 |
| fig 1.37 cyborg demo part 2 before 02/11/2020 |
 |
| fig 1.38 cyborg demo part 2 after 02/11/2020 |
Exercise 6: parallax
 |
| fig 1.39 parallax exercise 1 19/11/2020 |
 |
| fig 1.40 parallax exercise 2 19/11/2020 |
FEEDBACK
exercise 1: Mr. Martin said that my photo is too dark.
exercise 2: Mr. Martin said that my color matching is good and I could changed the size of the cowboy to make it better.
REFLECTION
Experience: I had gain a lot of photoshop skills throughout these exercises. I think I had learned something really cool throughout these exercise. Mr. Martin taught us a lot of ways to use photoshop.
Observation: I realize that practice will really help you to improve as the exercises going, my photoshop skill had definitely improved after these exercise.
Finding: I found that Photoshop is really good to use. It is not that hard to use either. After I knew these skills from this module, I can apply them to other module as well.


Comments
Post a Comment